

Ink Innovations
Screen Coating Rack
Screen Coating Rack - Default Title
SKU:
Finally a Wall-Mounted Screen-Coating-Rack for less than $300! Now everyone can afford a wall mounted screen-holder and start coating screens with "two hands" like the pros!
What is a screen coating holder and why do you need one? Are you holding the scoop coater with one hand while trying to hold the screen still with the other hand? Stop fighting against yourself and improve the quality of your coated screens by using “two hands” when applying emulsion to screens. With a screen holding rack, your screen is held securely while you coat with "two hands", which greatly improves control. You will coat screens faster and the emulsion will be applied with greater consistency.
Simple to use with a short learning curve: Our wall-mounted coating rack requires almost no learning curve. Using it is very simple. You will see improved screens and faster times with the very first batch of screens. A wall mounted coating rack will enable almost anyone in your shop to coat screens and will allow you to train new employees to coat screens quickly and effectively.
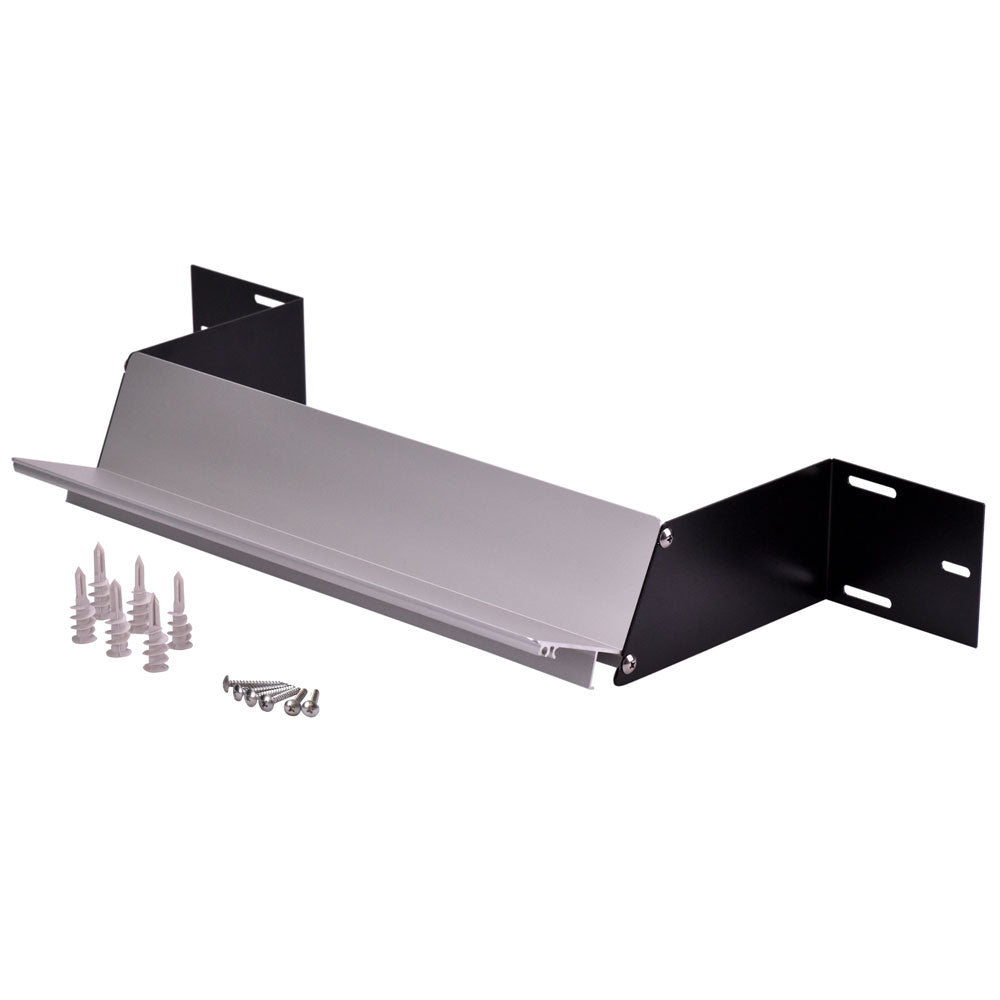
The Ultimate-Coating-Rack is made from the highest quality materials. Anodized aluminum is used for the primary "V-shelf" component and heavy gauge stainless steel is used for the wall brackets. Even the anchors are ultra-premium EZ anchors. The Ultimate Coating Rack includes everything you need to quickly and easily set up your new coating rack... All hardware is included (6) screws and (6) EZ-Anchors. (EZ-anchors make installation a breeze...no holes need to be drilled for EZ anchors. -- a drill is NOT required for the installation of our product!)
In stock
Couldn't load pickup availability
Additional Information
-
The Ultimate-Coating-Rack installs almost anywhere in minutes. You only need a Phillips head screwdriver, a pencil, a tape measure and a level.
-
Will accommodate screen 18" - 31"+
-
Proudly made in the USA.
- (1) 16” anodized aluminum extrusion with 4 stainless steel screws pre-installed
- (2) Heavy-duty, stainless steel wall brackets
- (6) Self-starting EZ Anchors
- (6) Screws for anchors
- (1) Instruction sheet
Tools required: Tape measure, level, Phillips-head screwdriver, pencil
1. Measure up from floor 22” then mark the wall with pencil.
2. Using a level, draw a level horizontal line 24” long (the line is 22” up from the floor).
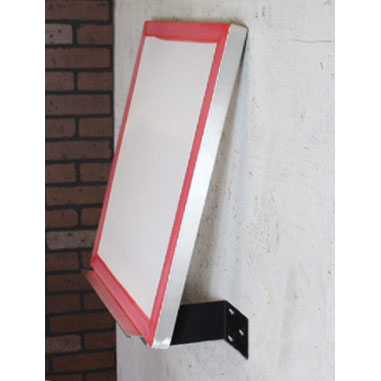
3. Install metal brackets onto both ends of aluminum scoop coater (see photo #2)
4. While holding the center of MMC extrusion, align the bottom of stainless steel brackets on the level line and then trace all six “oval” screw holes onto the wall.
5. Place metal coater/bracket assembly off to the side for next step.
6. Screw in the six white plastic wall anchors into the wall, in center of ovals. Anchors will make their own holes into drywall. If you hit a stud, then do not install an anchor and instead you will later drive a screw into the stud when mounting metal assembly.
7. Hold metal assembly against the wall and drive screws into anchors through the ovals in metal brackets into anchors to secure the rack to wall.